Getting Started
Apps empower you to create Mailbox sidebar extensions, making it possible to display your app’s content within an iframe in the conversation view sidebar. While you have the freedom to use any language, platform, or library to build your app, we also offer a JavaScript SDK and a React UI Kit to streamline your development process.
The sections below will guide you through setting up your first App 🚀
Create App
Building your sidebar app is flexible; it can be crafted using any language, library, or framework of your choosing.
Create JavaScript App
The subsequent sections illustrate different methods for creating a JavaScript app. These methods include utilizing our provided app template and manually setting up an app, with or without the use of Vite.
Prerequisites
The steps below will focus on building a JavaScript web app using our SDK. As a result, the following steps assume some familiarity with Node.js and npm.
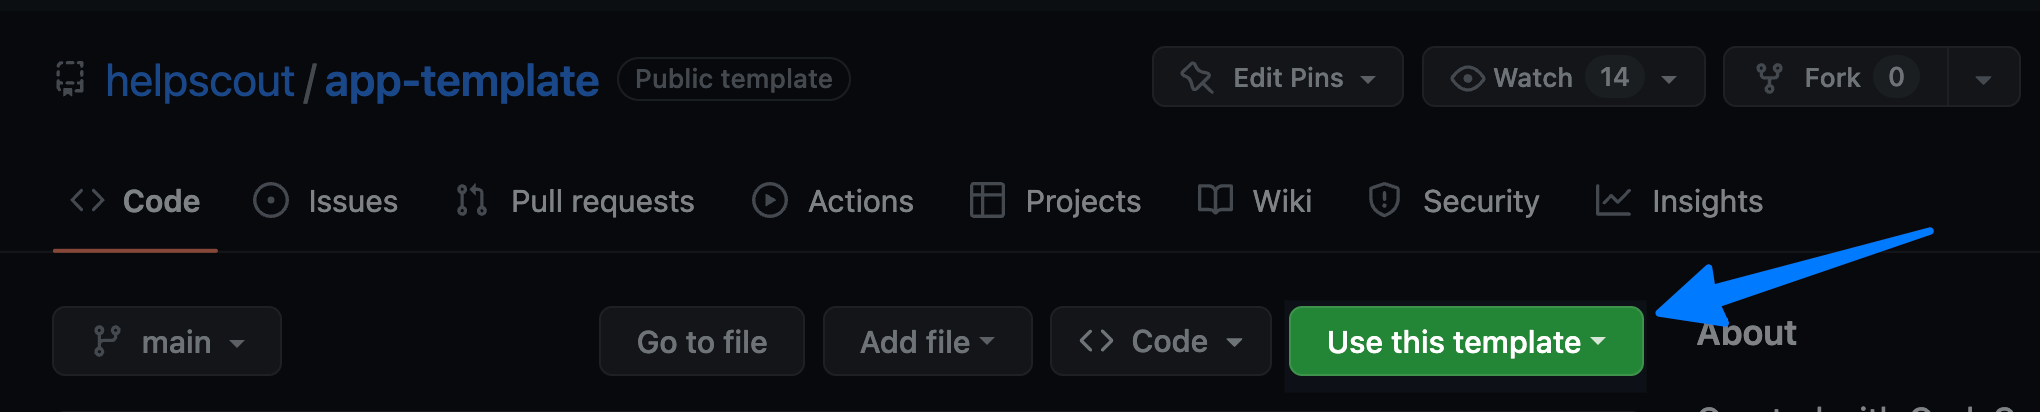
Quick setup with App template
Get started quickly with the React-based app template. This template comes with our JavaScript SDK and UI Kit pre-installed. Simply open the GitHub repo and click the “Use this template” button.
This template has everything to get you started, including sample code showcasing some of the JavaScript SDK and UI Kit features. Once you’ve cloned your copy of the template locally, you can get started by installing the npm packages and starting the server:
npm install
npm run watch
⏭️ Now that you have the app template running locally, skip down to the Help Scout App setup instructions to add the app to the sidebar.
Manual setup
Vite project setup
If you prefer to start from scratch or use a different framework, we recommend using Vite to set up your JavaScript/TypeScript project. Follow their Getting Started Guide for a quick start and skip down to the Install Help Scout packages section once you have it set up.
ℹ️ Note: SSL is required for all Apps so you’ll need to configure your Vite site with an SSL. We recommend using the vite-plugin-mkcert or @vitejs/plugin-basic-ssl Vite plugin.
Manual npm setup
We strongly recommend using one of the previous options (App Template or Vite) for a quicker and smoother setup. A manual setup of an npm web app may require numerous dependencies and configurations, which are beyond the scope of this document. However, if you still prefer a manual setup, follow these initial steps to create an npm package:
-
Create a new directory for your new application and navigate into it:
mkdir myawesomeapp cd myawesomeapp -
Initialize npm to create the
package.jsonfile for your app:
npm init
Follow the prompts to fill out the details about your project.
💡 Tip: You can instead use
npm init -yto skip the questionnaire
Keep in mind that you’ll need to configure the web app further, which involves installing and setting up various dependencies. The specifics of this process will depend on your chosen stack and requirements.
Install packages
If you didn’t use the app template linked above, you’ll need to install the npm packages:
-
Install the JavaScript SDK:
npm install @helpscout/javascript-sdk -
Install the UI Kit
npm install @helpscout/ui-kit
Implement your App
-
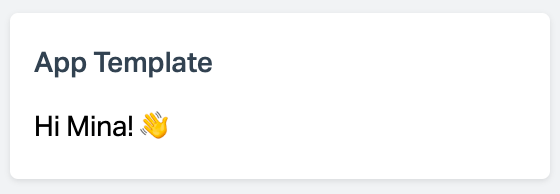
To implement a demo app with some of the available features, create or edit the
App.tsxorApp.jsxfile to read:import React from "react"; import HelpScout from "@helpscout/javascript-sdk"; import { DefaultStyle, Heading, useSetAppHeight } from "@helpscout/ui-kit"; import { useEffect, useState } from "react"; function App() { const appRef = useSetAppHeight(); const [userFirstName, setUserFirstName] = useState("there"); useEffect(() => { HelpScout.getApplicationContext().then(({ user }) => setUserFirstName(user?.firstName || "there") ); }, []); return ( <div className="App" ref={appRef}> <DefaultStyle /> <Heading level="h1">Hi {userFirstName}! 👋</Heading> </div> ); } export default App; -
Start the app on a network available host
💡 Tip: If you are using Vite, you can do that by running
npm run build && npm run preview -- --host. Be sure to use one of the Network URLs (not the Local URL) as your callback URL.
Create App without JavaScript
If you prefer not to use JavaScript, you can create your app using any language, library, or framework of your choosing.
For more information on how to access Help Scout data from your app, see the Getting Data from HelpScout without JavaScript guide.
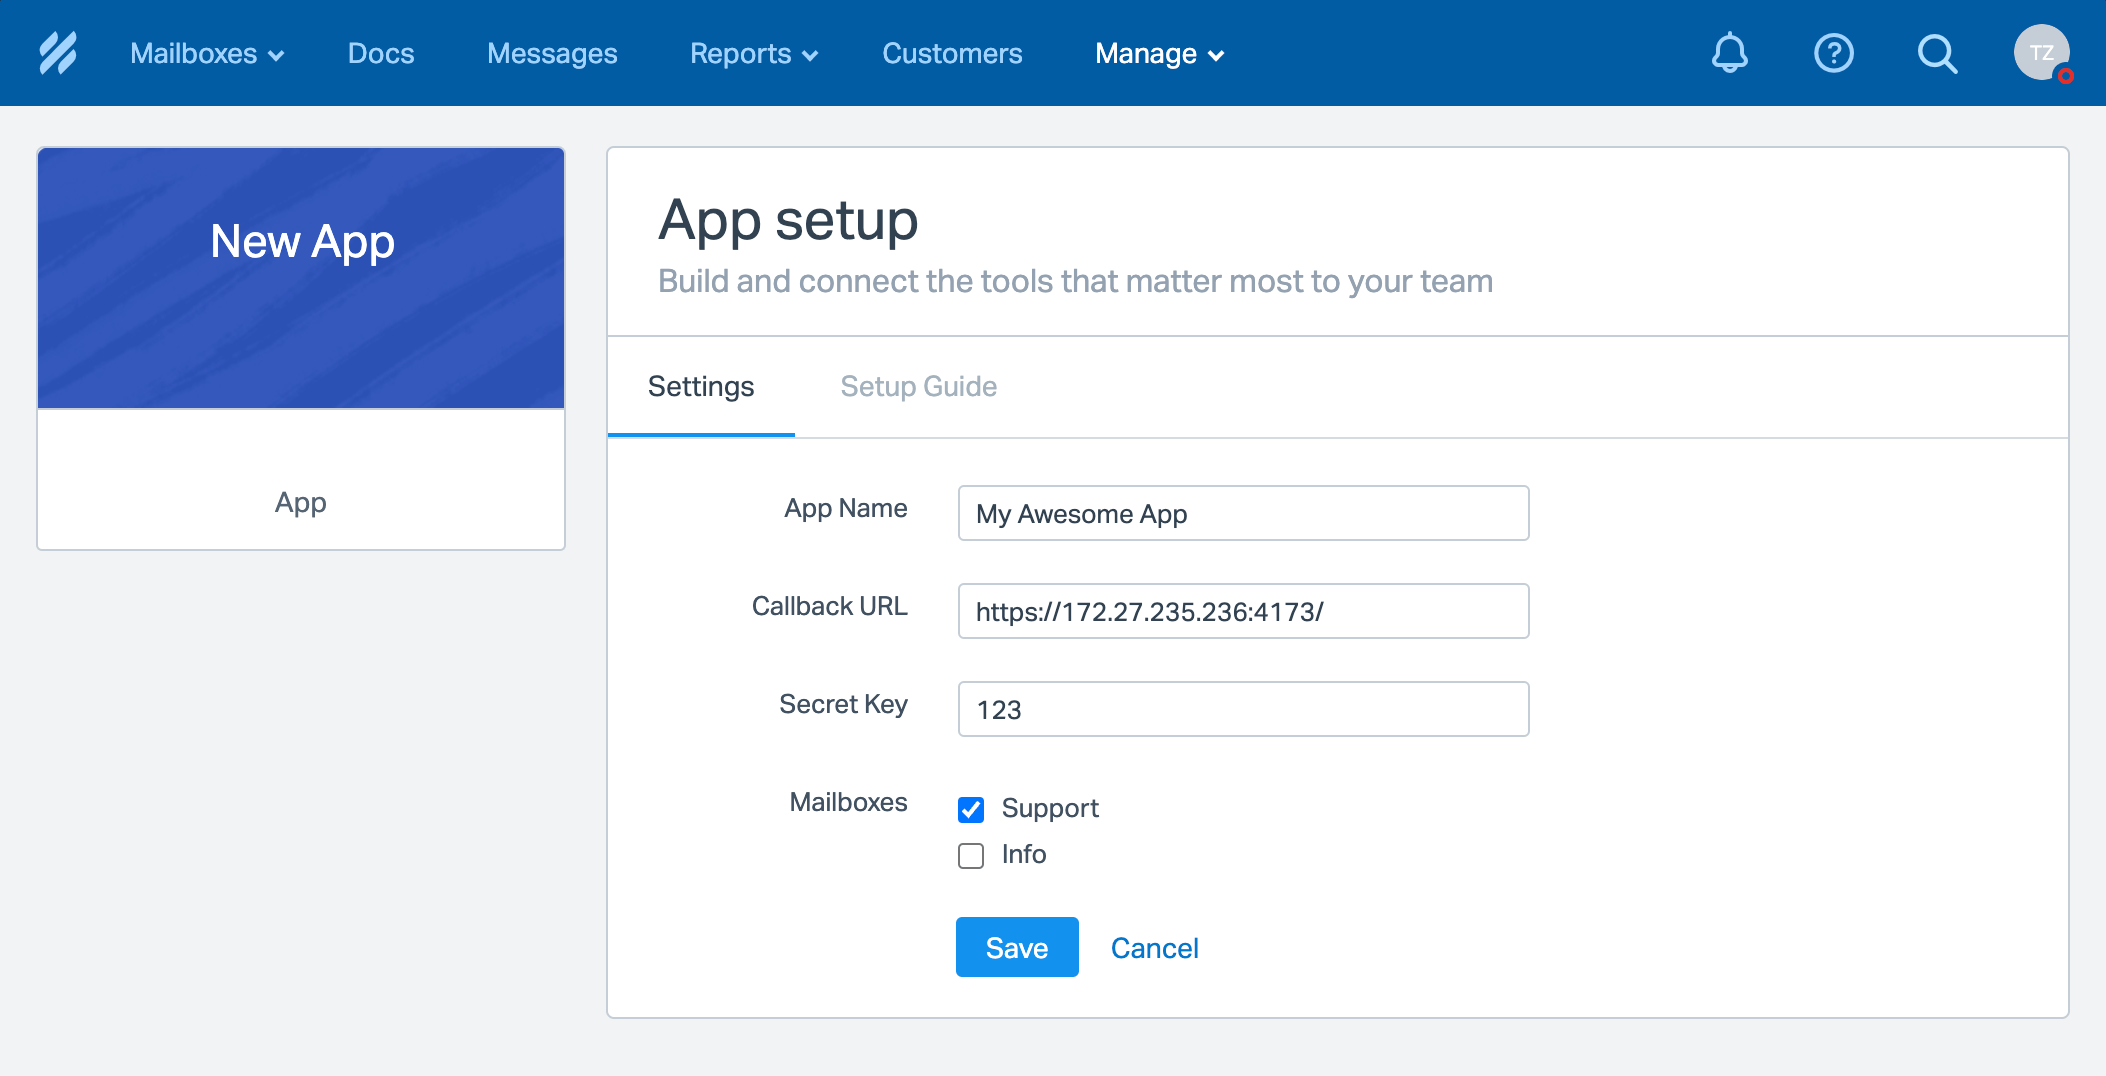
Install App
- Log into your Help Scout account as an administrator or account owner.
- Head to Manage > Apps in the navigation bar.
- Click the “Create” button (on the top of the page).
- Click the “Create App” button (on the left sidebar).
- Complete the form using the following as a guide:
- App Name:
My Awesome App - Callback URL: Enter the URL of your web app — The URL host has to be network available (
localhostor127.0.0.1will not work) - Secret Key: Enter any value — If your app is validating the header signature, this is the key that is used to generate it
- Mailboxes: Select the mailboxes where this app should appear
- App Name:
- Click the “Save” button.
Access App
Once you’ve created your app, you can easily access it within Help Scout’s conversation sidebar. Follow the steps below to view your new app:
- In the navigation menu, click on “Mailboxes” and select one of the mailboxes you associated with your app during its creation.
- Open a conversation within the chosen mailbox.
- Locate “My Awesome App” in the sidebar.
💡 Tip: You can drag the app to your desired position!
With your app now integrated into Help Scout, your team can enjoy a streamlined workflow and access valuable information without leaving the conversation view.